For an internal application in a private network, there is no accessible paths to the application hosting platform from public internet, that’s mean Azure DevOps (ADO) Microsoft-hosted agent cannot access your hosting platform for application deployment.

There are two approaches, each has its pros & cons, and it depends on your organization culture and security policy:
- Open the necessary firewall for the Microsoft-hosted agent
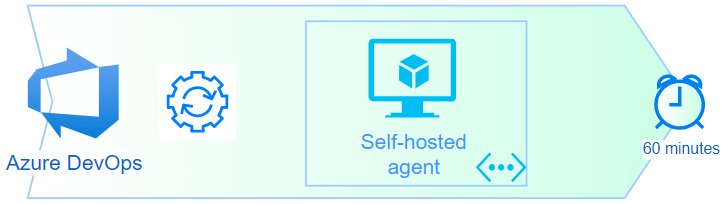
- Provision a self-hosted agent within internal network (shown in diagram above)
You should work out the approach with your networking team and security team. I am going to highlight the concerns encountered before when working with enterprise customers. Note that for provisioning Azure Services, it is not a problem since it is an ‘Azure to Azure’.
Open firewall
The advantage of opening firewall is to let Microsoft taking care of the agent maintenance. On the other hand, ‘opening firewall’ is usually a concern from enterprise organization. Frankly, I didn’t experience any enterprise customer using this approach. If your organization is okay for this approach, there are two considerations:
- IP addresses for the Microsoft-hosted agent vary over time
- IP addresses is not dedicated to your own Microsoft-hosted agent
Microsoft provides a solution for changing of IP addresses by publishing a weekly JSON file broken out by region, and also provided a C# sample to get the list of IP addresses that aligns with your region. It should not be too difficult to create an automated solution from it. For details, you could check out Microsoft-hosed agent – Networking (MS Doc link).
Self-hosted agent
With self-hosted agent, there is no requirement for incoming access to your organization internal network. Even though the agent needs to communicate with Azure DevOps, the agent pulls from it, which requires only outbound https (443). However, you now need to maintain the virtual machine that host the agent as well as installing the necessary software for the agent to do the job.
When going with this approach, we should limit the number of agents and shared them across the organization to minimize operational efforts. These shared agents should also be provisioned into a virtual network that can access all the other virtual networks so that it can deploy application everywhere internally.
Private Network
For demonstration and testing purpose, I need to create a private network for my organization, which utilizes the foundational services: Virtual Network as well as Virtual Network Gateway for connectivity:
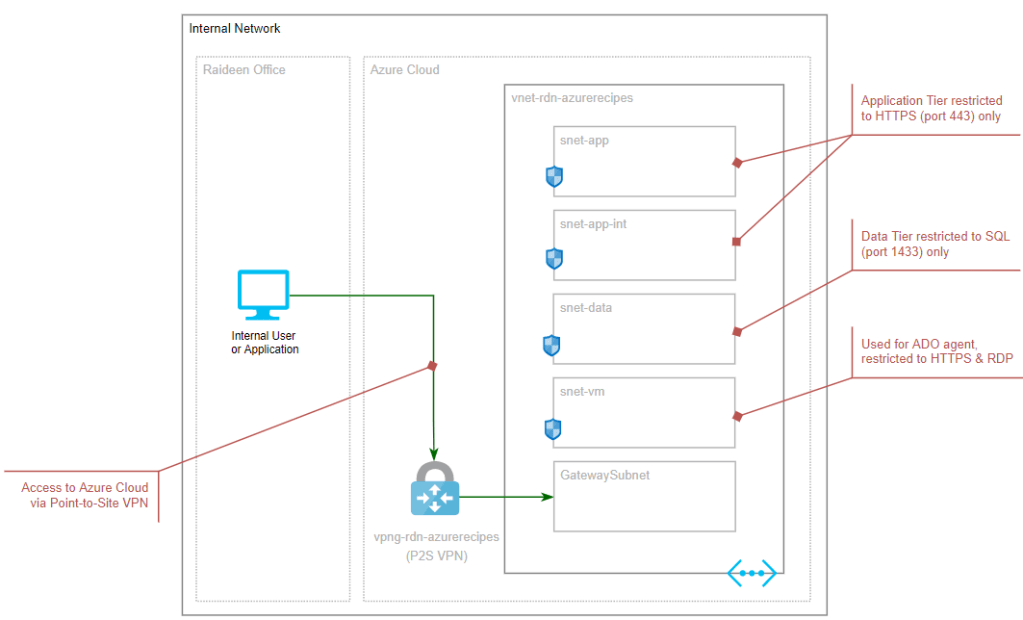
Basically, the topology has a single Virtual Network with multiple subnets, each subnet acts like a tier and is protected by Network Security Group. To connect from my office or home computer, I utilize Virtual Network Gateway with Point-to-Site (MS Doc link). I am placing the Azure DevOps (ADO) self-hosted agent in the Virtual Machine subnet just for simplicity, you should consider having a ‘management’ virtual network for the ADO self-hosted agent since it should be shared across your organization and access to different virtual networks.
IMPORTANT: The connectivity between your organization network and Azure Cloud should be designed and implemented by your organization networking team and security team by utilizing Site-to-Site VPN or Express Route.
For testing purpose, I configure a Point-to-Site VPN with the following steps:
- Execute the self-sign-cert.ps1 to generate the required certificates and store in My certificate store and export the public key for root certificate in base64 format
- Copy the public key exported in previous step from the rootcert-base64.txt
- Store the value as a secret, cicd-gateway-cert, in Key Vault
- Execute create-network.ps1 to provision the private network and the gateway as well as force an update to create Point-to-Site configuration
For your information, here is how to use Key Vault reference in the bicep parameter to retrieve a secret:
"base64RootCert": {
    "reference": {
        "keyVault": {
            "id": "/subscriptions/<your-sub-id>/resourceGroups/<your-rg-name>/providers/Microsoft.KeyVault/vaults/<your-kv-name>"
        },
        "secretName": "cicd-gateway-cert"
        }
}
The complete set of code can be found in GitHub (link). You can find the full instruction for configuring a Point-to-Site VPN in Microsoft documentation: Configure a P2S VPN – Azure PowerShell (MS Doc link)
Automated Agent Provisioning
The steps required to provision a self-hosted agent can be found in Microsoft documentation, for example, Self-hosted Windows agents (MS Doc link). I have scripted out these steps so that we can ‘automate’ the provisioning, the script is intended to be executed by a person who has the necessary permission, e.g., a Cloud Engineer in your organization or you. With the script, you could rebuild the agent regularly without the latest O/S version and up-to-date software without a lot of effort. Basically, here are the main steps:
- Provision a virtual machine (VM) for the self-hosted agent
- Download and install software prerequisites
- Download and configure Azure DevOps agent
- Download and install additional software required for build
These steps are encapsulated in the create-buildagent.ps1, and it is the script you need to execute. First of all, you need to have 3 pieces of information added as Secrets into Key Vault:
- Login name for the VM, ado-buildagent-login
- Login password for the VM, ado-buildagent-password
- Azure DevOps Personal Access Token (PAT), ado-buildagent-pat
The PAT requires only Agent Pools (read, manage) plus Deployment group (read, manage) if deployment groups (MS Doc link) is utilized.
The complete set of automated script can be found in GitHub (link).
Provision Virtual Machine
For VM provisioning, we need to know the target virtual network (VNET) and subnet for the virtual machine, the resource group for the VNET, name of the Key Vault to pull the secrets and a few other parameters. The same approach as before, Azure Bicep is used: main.bicep with vm-win11.bicep module:
# Settings for provisioning Virtual Machine
$rgName = 'rg-demo-azurerecipes'
$buildAgentRawName = 'demo-buildagent'
$vnetName = 'vnet-demo-azurerecipes'
$snetName = 'snet-vm'
$rgNameForVnet = 'rg-demo-networking'
$patName = 'ado-buildagent-pat'
$osComputerName = 'AdoAgent01'

# Provision Build Agent VM
$rgFullName = "$rgName-$env"
$vnetFullName = "$vnetName-$env"
$snetFullName = "$snetName-$env"
$rgFullNameForVnet = "$rgNameForVnet-$env"
$vmFullNameNoPrefix = "$buildAgentRawName-$env"
$vmFullName = "vm-$buildAgentRawName-$env"
$kvFullName = "$kvName-$env"
$osComputerFullName = "$osComputerName$env"

az deployment group create --resource-group $rgFullName `
    --template-file './main.bicep' `
    --parameters vmNameNoPrefix=$vmFullNameNoPrefix --parameters osComputerName=$osComputerFullName `
    --parameters vnetName=$vnetFullName --parameters subnetName=$snetFullName `
    --parameters keyVaultName=$kvFullName --parameters rgNameForVnet=$rgFullNameForVnet
If Bicep module is used, here is another approach to get secret from Key Vault by passing the reference as parameter, make sure the secrets are populated before running the script:
resource keyVault 'Microsoft.KeyVault/vaults@2022-07-01' existing = {
  name: keyVaultName
}

module vmBuildAgent './vm-win11.bicep' = {
  name: '${vnetName}-${unqiueUtc}'
  params:{
    vmLocation: location
    vmNameWithoutPrefix: vmNameNoPrefix
    computerName: osComputerName
    vnetName: vnetName
    subnetName: subnetName
    vmAdminLogin: keyVault.getSecret('ado-buildagent-login')
    vmAdminPassword: keyVault.getSecret('ado-buildagent-password')
    rgNameForVnet: rgNameForVnet
  }
}
Run Script in Virtual Machine remotely
This method is relatively handy for our needs to configure the virtual machine as Azure DevOps agent. Of course, there are other solutions, such as creating specific image, then provision the virtual machine from the image. It is great if your organization has pre-built image for Azure DevOps agent, and you should go with it. For running the script remotely, there are a few considerations:
- Scripts run remotely as System on Windows
- Only one script can be run at a time
- Scripts cannot be cancelled
- Timeout is 90 minutes
IMPORTANT: Do not prompt for information because no one can enter the response. If you do so, the script is stuck, and you cannot cancel it. The only way out is to wait for timeout, which is 90 minutes.
To run script, use az vm run-command invoke by providing the virtual machine name and the corresponding resource group name with RunPowerShellScript as command-id. The script is better be on its own file and you can optionally provide parameter to the script. For example:
# Install and configure Python for build agent
az vm run-command invoke --resource-group $rgFullName --name $vmFullName `
    --command-id RunPowerShellScript --scripts @buildagent-python.ps1 `
    --parameters "agentFolder=$agentFolder"
Install Prerequisites
Azure DevOps agent requires a few prerequisites and fundamental packages. I would suggest installing the latest version or align with your organization standard, instead of the minimum requirements of those software:
- PowerShell Core
- This link (https://github.com/PowerShell/PowerShell/releases/latest) point to the latest release, and you can copy the latest link for the win-x64.msi
- Azure CLI
- This link (https://aka.ms/installazurecliwindows) is a direct download for the latest version
- .NET Core
- This link (https://dotnet.microsoft.com/en-us/download) point to the download page, where you can find out the link to download the latest SDK
- SQL Command Line Tool
- This link (https://go.microsoft.com/fwlink/?linkid=2142258) point to the download page, where you can find out the link to download the tool
- It also requires ODBC Driver for SQL (https://go.microsoft.com/fwlink/?linkid=2200731) and Visual C++ 2017 redistribution pack (https://aka.ms/vs/15/release/vc_redist.x64.exe)
Once you have the up-to-date links, update the variables in buildagent-prereq.ps1:
# Software download Urls
$powerShellUrl = "https://github.com/PowerShell/PowerShell/releases/download/v7.2.5/PowerShell-7.2.5-win-x64.msi"
$dotNetiUrl = "https://download.visualstudio.microsoft.com/download/pr/9a1d2e89-d785-4493-aaf3-73864627a1ea/245bdfaa9c46b87acfb2afbd10ecb0d0/dotnet-sdk-6.0.400-win-x64.exe"
$azureCliUrl = "https://aka.ms/installazurecliwindows"

# Command to be executed for installation
$msiPowerShell = "PowerShell.msi"
$msiAzureCli = "AzureCli.msi"
$exeDotNet = "dotnet-install.exe"

mkdir C:\Temp
Set-Location C:\Temp

# Install PowerShell and enable automated update via Windows Update
Invoke-WebRequest -Uri $PowerShellUrl -OutFile $msiPowerShell
msiexec.exe /package $msiPowerShell /quiet ADD_EXPLORER_CONTEXT_MENU_OPENPOWERSHELL=1 ADD_FILE_CONTEXT_MENU_RUNPOWERSHELL=1 ENABLE_PSREMOTING=1 REGISTER_MANIFEST=1 USE_MU=1 ENABLE_MU=1

# Install Azure CLI
Invoke-WebRequest -Uri $AzureCliUrl -OutFile $msiAzureCli
msiexec.exe /package $msiAzureCli /quiet

# Install dotNet
Invoke-WebRequest -Uri $DotNetiUrl -OutFile $exeDotNet
&".\$exeDotNet" /install /quiet /norestart
Install & Configure Azure DevOps Agent
The installation and configuration of ADO agent are handled by buildagent-install.ps1 script, which is the same steps as in Microsoft documentation (MS Doc link). You need to update the setting variables as highlighted below and ensure generating the Personal Access Token (PAT) correctly and store it as secret (e.g., ado-buildagent-pat) in Key Vault.
# Install and configure the Build Agent
param (
    [string] $PAT,
    [string] $agentFolder
)

# Setting for configuring agent in Azure DevOps
$buildAgentName = "agent-win11-01"
$adoOrgUrl = "https://dev.azure.com/<your-org-name>"
$buildAgentDownloadUrl = "https://vstsagentpackage.azureedge.net/agent/2.206.1/vsts-agent-win-x64-2.206.1.zip"

# configuration variables
$agentZip = "vsts-agent.zip"

# Install Build Agent
mkdir $agentFolder
Set-Location $agentFolder
Invoke-WebRequest -Uri $buildAgentDownloadUrl -OutFile $agentZip
Expand-Archive -LiteralPath $agentZip -DestinationPath $agentFolder
.\config.cmd --unattended `
    --url $adoOrgUrl `
    --auth pat --token $PAT `
    --pool default --agent $buildAgentName `
    --runAsService --windowsLogonAccount 'NT AUTHORITY\NETWORK SERVICE'
Install additional software
Depend on your needs, you may need to install additional software package to the agent. I am using Python as an example since I can’t figure it out from Microsoft documentation (MS Doc link) until I read an answer in Stack Overflow (link) from timdadev, thank you.
Basically, you need to determine the version of Python you need and find out the download link, for example: version 3.10.6 and link is https://www.python.org/ftp/python/3.10.6/python-3.10.6-amd64.exe (line #7), then create a folder with the same version number under the Azure DevOps agent folder (line #16 and #17). Once the installation is complete, you need to generate an empty file (line #22).
# Install and configure Python for the Build Agent
param (
    [string] $agentFolder
)

# Software download Urls
$pythoniUrl = "https://www.python.org/ftp/python/3.10.6/python-3.10.6-amd64.exe"

# configuration variables
$agentFolder = "C:\agents"
$exePython = "python-install.exe"

# Install Python
# Credit to: https://stackoverflow.com/users/11317673/timdadev @ https://stackoverflow.com/questions/60936103/install-python-to-self-hosted-windows-build-agent
# Note: make sure the version number is the same as in the path
$pythonInstallFolder = "$agentFolder\_work\_tool\Python\3.10.6\x64"
mkdir $pythonInstallFolder
Set-Location $pythonInstallFolder
Set-Location ..
Invoke-WebRequest -Uri $PythoniUrl -OutFile $exePython
&".\$exePython" /quiet InstallAllUsers=1 TargetDir=$pythonInstallFolder Include_launcher=0
"" > x64.complete
Closing up
I hope this make your life easier to provision an Azure DevOps self-hosted agent, and this is a prerequisite for upcoming application scenario, internal application, to deploy application internally in your private network.
