Prerequisites
Just want to stay the obvious here, in order to try out the recipes, you need to have access to:
- Azure Subscription – Create Your Azure Free Account Today (link)
- Azure DevOps Organization – Start free – Azure DevOps Services (link)
IMPORTANT: Since Microsoft disabled the free grant of parallel jobs by default, which is required to run the pipeline, you need to request for it (link to request parallel jobs)
Preparation
Project in Azure DevOps
There is always a debate on how to structure projects in Azure DevOps. My preference or suggestion is creating one project in Azure DevOps for each ‘product’ you are going to build. A product can contain one or more applications. To create a project in Azure DevOps, you could follow the instruction in Microsoft documentation (MS Doc link) or you could use script in my GitHub project (GitHub project link)
The script is nothing fancy, it uses Azure CLI to create the project:
# Update the variable according to your setting
$orgURL = 'https://dev.azure.com/<your-org>'
$projName = '<your-proj>'
$projDesc = '<your-description>'
$projProcess = 'Scrum'

# Create a new project, and set it as default
az devops configure --defaults organization=$orgURL
az devops project create --org $orgURL --name $projName --description $projDesc --process $projProcess
az devops configure --defaults project=$projName
Then, initialize the Git repo with main branch and develop branch:
# Initialize Repo with main and develop branch
git config --global init.defaultBranch main
git clone (az repos list --query [0].webUrl)
Set-Location ".$projName"
$projName > Readme.md
git add .
git commit -m "Initialize Repo"
git push
git branch develop main
git checkout develop
"$projDesc" >> .Readme.md
git add .
git commit -m "Added develop branch"
git push --set-upstream origin develop
Finally, create three (3) environments, DEV, TEST and PROD. Fyi, I was having trouble to find out what CLI command to use, thanks to Colin‘s post, problem solved (Link to his post).
$environmentList = 'DEV', 'TEST', 'PROD'
foreach ($env in $environmentList)
{
    $requestBody = @{
        name = $env
        description = "This is $env environment"
    }
    $infile = "requestBody.json"
    Set-Content -Path $infile -Value ($requestBody | ConvertTo-Json)
    az devops invoke `
        --http-method POST --in-file $infile `
        --area distributedtask --resource environments `
        --route-parameters project=$projName --api-version "6.0" `
}
Remove-Item $infile
Folder Structure in Repo
For folder structure, I would suggest to store both the Infrastructure as Code and Application Code in the same repo, for example:
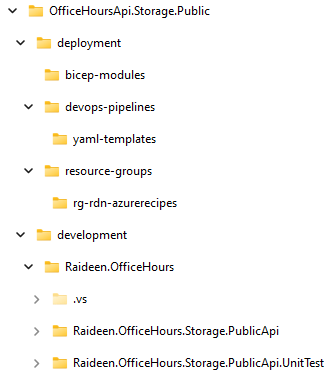
The folder name should be self-explained, and I will explain the folder usages in later posts. It may seems a bit overkill but this structure is designed (and validated) for scalability to handle large product.
Foundational Services in Azure
There are a couple of foundational Azure Services needed for implementing CI/CD Automation, it depends on your organization policy, you may be able to create them yourself or you may need to go through some other teams to create them.
First, you need a Resource Group (MS Doc link), which associates all the required Azure Services for your product, and it also provides a security boundary (see Service Connection) for the CD pipeline. Once the resource group is created, you should create a Key Vault (MS Doc link) to store sensitive information for the pipelines as well as your products. Below is the script (GitHub project link) to create the resource group and key vault for three (3) environments:
# Update the variables below according to your setting
$rgName = '<your-resource-group>'
$kvName = '<your-key-vault>'
$kvRetentionDay = 7
$environmentList = @(
    @{ name='dev'; subscription='<your-dev-subscription>'; location='<your-dev-region>' }
    @{ name='test'; subscription='<your-test-subscription>'; location='<your-test-region>' }
    @{ name='prod'; subscription='<your-prod-subscription>'; location='<your-prod-region>' }
)

# Login to Azure if needed
$account = (az account show)
if (!$account)
{
    az login
}

# Create base Azure Services in each environment
foreach ($env in $environmentList)
{
    $rgFullName = ($rgName + '-' + $env.name)
    $kvFullName = ($kvName + '-' + $env.name)
    az account set --subscription $env.subscription
    az group create --location $env.location --name $rgFullName
    az keyvault create --resource-group $rgFullName --name $kvFullName --retention-days $kvRetentionDay
}
You may also need a Virtual Network (MS Doc link) if your product is an ‘internal’ application, I would suggest to work with your network team to create one so that all the network address spaces are aligned with your corporate network settings. If you are trying out the recipes, you can create one within your own subscription.
Service Connection in Azure DevOps
To provision Azure Service from Azure DevOps, an Azure Resource Manager (ARM) service connection is required. You could follow the instruction in Microsoft documentation (MS Doc link) with the ‘automatic’ approach to create one. Unfortunately, this approach generates the same service principal name for all your service connections for the same project, you can only tell different by finding out the object Id.
In addition, since the creation process need to add an Application (Service Principal) in Azure Active Directory, you may not have the permission to do so as some organizations restrict the access to Azure Active Directory. Therefore, I prefer to create the service connection ‘manually’ (MS Doc link) with an existing service principal.
After creating Service Principal, you needs to:
- Capture the Application (client) ID
- Generate a new secret or certificate used by ADO to authenticate (MS Doc link)
- Grant Reader role on the Azure subscription to the Service Principal
- Grant Contributor role on the Resource Group(s) to the Service Principal
Now, you are ready to create the Service Connection manually in Azure DevOps.
IMPORTANT: For creating service connection automatically, you should select a resource group under the subscription to limit the security exposure and use one service connection/service principal per environment, or at a minimum, use a dedicated service connection/service principal for the production environment.
Series continue at: Recipe: Public Web App with Storage Account (coming soon)
