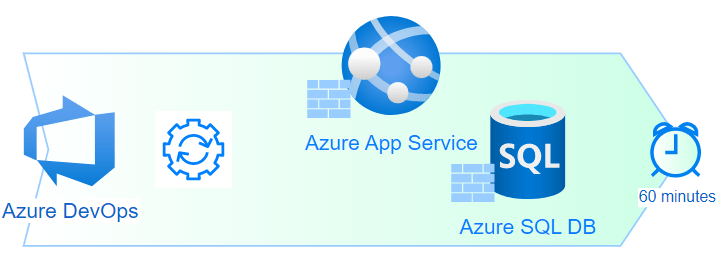
This is the second recipe, which introduces additional Azure Services and approaches. If you haven’t read the first one, you can find it here (link). The usage scenario is a public web application; however, it is restricted to predefined IP ranges, Restricted Azure App Service with SQL Database. Here are the characteristics or matching criteria:
- Application utilizes web protocol, https, to communicate with end user or consuming application, such as MVC Web App, REST API, etc.
- Application is accessible from public internet without authentication and authorization
- Data is served from one or more public network routable Azure SQL Database
- Access to both web application and SQL database are restricted to predefined IP addresses
- Data sensitivity is low, which has no or low impact to the organization
Here are the areas I would like to demonstrate in this recipe:
- Store confidential provision settings (e.g., login, password, etc.) in Key Vault
- Utilize IP restriction in both Web App and SQL database to limit network access
- Enable SQL permission in Azure SQL Database with Managed Identity (MS Doc link)
- Demonstrate CI/CD automation with Azure DevOps using Bicep and YAML
You can find all the code in GitHub (link).
Application Example
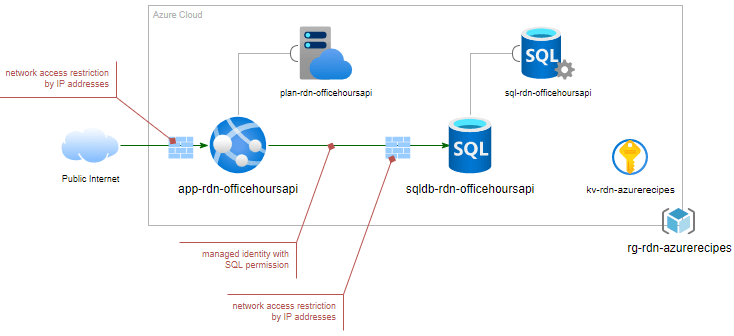
I am using ‘Office Hours API’ as a web app, which is implemented as a REST API with SQL database as backend. This web app provides information to the associated partners’ applications about office hours for an organization’s office as well as opening hours for their retails store. Below diagram shows the deployment model into Azure Cloud:
Walkthrough
Storing confidential settings in Key Vault
It is recommended to store any confidential/sensitive information as secret in Key Vault, such as admin username and password, connection strings, etc., for both deployment-time and runtime of your product. In this scenario, three (3) pieces of information are manually added in Key Vault for our CD pipelines:
- SQL Admin Login
- SQL Admin Password
- SQL Azure Active Directory Admin Username
The pipeline retrieves this information during deployment so make sure you grant the get secret permission to the Azure DevOps Service Principal.
        - task: AzureKeyVault@2
          displayName: 'Get required secrets'
          condition: ne('${{parameters.keyVaultName}}', '')
          inputs:
            azureSubscription: ${{parameters.serviceConnection}}
            KeyVaultName: $(kv-full-name)
            SecretsFilter: 'cicd-sqlSvrAdminPassword,cicd-sqlSvrAdminLogin,cicd-sqlSvrAadUser'
            RunAsPreJob: false
Alternatively, you can use getSecret function to retrieve secrets in the bicep template, I will demonstrate this approach in a later recipe.
Access Restriction: Azure App Service
By default, Azure App Service can be accessed anyway from public internet without restriction. To limit the access, we can either add IP address-based rule or service endpoint-based rule. In our recipe, we have a bicep module, app-service-firewall.bicep, to add IP address-based rules:
var ipAddressesAllowed = [for (ip, ctr) in allowedIpList: {
  action: 'Allow'
  name: '${ruleName}-${ctr}'
  priority: (100+ctr)
  ipAddress: ip
}]

var ipAddressesScmAllowed = [for (ip, ctr) in allowedIpListScm: {
  action: 'Allow'
  name: '${ruleName}-${ctr}'
  priority: (100+ctr)
  ipAddress: ip
}]

resource firewallRules 'Microsoft.Web/sites/config@2022-03-01' = {
  parent: webApp
  name: 'web'
  properties: {
    ipSecurityRestrictions: ipAddressesAllowed
    scmIpSecurityRestrictions: ipAddressesScmAllowed
  }
}
This module allows adding one or more rules to web app and the scm site (i.e., Kudu) based on the array parameters, allowedIpList and allowedIpListScm accordingly. You could whitelist multiple IP sources internally or externally for the web app to fit your needs, and a ‘Deny-All’ rule is automatically added once you add any IP rule to restrict access:
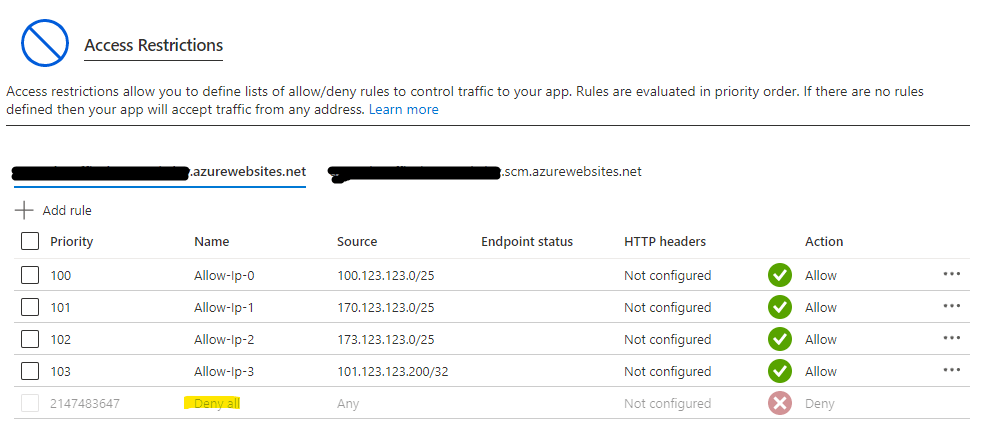
IMPORTANT: You should whitelist only your DevOps team to access the scm (Kudu) site.
Access Restriction: SQL Database
By default, Azure SQL Database is totally locked down by blocking all accesses, you need to add firewall rules, either server-level or database-level, to allow access to the database. We are using server-level firewall rule to allow access from Web App. First of all, we need to determine the outbound addresses of the Web App, which is relatively easy since there is a property for it:
resource webApp 'Microsoft.Web/sites@2022-03-01' = {
  name: webAppName
  location: webAppLocation
  identity:{
    type: 'SystemAssigned'
  }
  properties: {
    serverFarmId: webAppServicePlan.id
    siteConfig: {
      linuxFxVersion: fxConfigure[langEngine].fxVersion
      appSettings: appSettings
    }
    httpsOnly: true
  }
}

output id string = webApp.id
output managedIdentityId string = webApp.identity.principalId
output outboundIps string = webApp.properties.possibleOutboundIpAddresses
Then, we create server-level IP rules in Azure SQL by looping through those address, which is handled by a bicep module, sql-server-firewall.bicep and don’t forget to add your own IP address so that you can perform the necessary validation or testing.
resource firewallRules 'Microsoft.Sql/servers/firewallRules@2022-02-01-preview' = [for (ip, ctr) in ipAddresses: {
  parent: sqlServer
  name: '${ruleName}-${ctr}'
  properties: {
    startIpAddress: ip
    endIpAddress: ip
  }
}]
IMPORTANT: The outbound addresses are shared with other Azure App Service customers, which means they have a network path to reach to your SQL database. Therefore, your SQL database must have proper authentication and authorization. If this is a concern, you could use Private Endpoint in Azure SQL and VNET Integration in Azure App Service to lock down the access. Please check out the upcoming recipe for this usage scenario. App Service Environment and SQL Managed Instance can also be used.
Configure Managed Identity to access SQL database
When solutioning your application in Azure, we should use Managed Identity as much as possible. For Web App to access SQL database, there are a few steps:
- Enable Managed Identity in the Web App (see code sample above)
- Configure Azure Active Directory (AAD) authentication in Azure SQL
- Add Web App Managed Identity as SQL User to the SQL database
- Grant proper permissions to the Managed Identity SQL User
The bicep module, sql-server.bicep, takes care of configuring AAD authentication by adding an AAD user as an administrator, which requires both the username as well as the object id of the user:
// Enable Azure AD administration, required for managed identity
resource sqlServerAAD 'Microsoft.Sql/servers/administrators@2022-02-01-preview' = {
  name: 'ActiveDirectory'
  parent: sqlServer
  properties: {
    administratorType: 'ActiveDirectory'
    login: aadAdminLogin
    sid: aadAdminObjectId
    tenantId: tenant().tenantId
  }
}
To determine the object Id, we could use Azure CLI command below, which requires Directory.Read.All permission in Microsoft Graph API.
$sqlAadUserObjectId = (az ad user show `
    --id '$(cicd-sqlSvrAadUser)' --query "id" --output tsv)
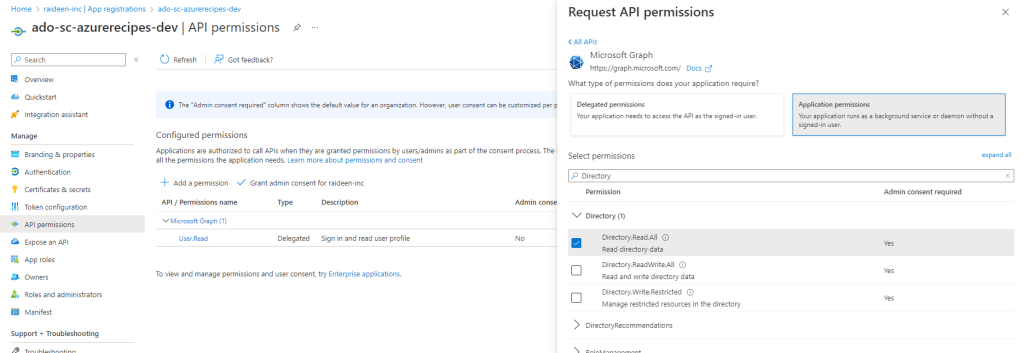
Make sure you and/or the Service Principal used for Azure DevOps service connection does have the permission using Azure Portal, here are high-level steps:
- Under Azure Active Directory, access App Registrations
- Find your Service Principal for the Azure DevOps service connection, click on it
- Select API permission on the left menu, then click on Add a permission
- Select Microsoft Graph, then click on Application permissions
- Search and select Directory.Read.All, then click Save
- Click on the Grant admin consent
According to Microsoft documentation (MS Doc Link), you can manually add the user by signing into the SQL database with AAD authentication and executing a few SQL statements. With CI/CD automation, unless the Azure DevOps Service Principal is used for AAD SQL administrator, it is not possible to login with AAD authentication. Instead, we need to login using SQL authentication, and determine Application Id for the managed identity in the form of byte array. Since the SQL database is locked down, we also need to temporarily open the firewall to execute the statements. All of these are handled in sql-add-user.ps1 script:
# Get names from deployment
$outputs = (az deployment group show --resource-group $resourceGroupName --name $deploymentName `
  --query "{sqlSvrName:properties.outputs.sqlSvrName.value, sqlSvrFqdn:properties.outputs.sqlSvrFqdn.value, sqlDbName:properties.outputs.sqlDbName.value, webAppName:properties.outputs.webAppName.value}")
  | ConvertFrom-Json

# Retrieve the App Id
# NOTE - Azure DevOps Service Principal need to have Directory.All.Read
$appSp = (az ad sp list --display-name $($outputs.webAppName)) | ConvertFrom-Json
$principalAppId = $appSp.appId

# hard-coded for testing
#$principalAppId = '062182d8-a4cf-47b2-9801-0979581e559f'

# convert to byte array
# Credit to: https://fgheysels.github.io/managed-identity-users-in-sql-via-devops/
[guid]$guid = [System.Guid]::Parse($principalAppId)
$byteGuid = "0x"
foreach ($byte in $guid.ToByteArray())
{
    $byteGuid += [System.String]::Format("{0:X2}", $byte)
}

# Open Sql Firewall for the agent
$agentIP = (New-Object net.webclient).downloadstring("https://api.ipify.org")
az sql server firewall-rule create --name 'agent-rule' --resource-group $resourceGroupName --server $outputs.sqlSvrName --start-ip-address $agentIP --end-ip-address $agentIP

# Execute Sql script - add user for managed identity
SqlCmd -S "tcp:$($outputs.sqlSvrFqdn),1433" -d $($outputs.sqlDbName) -U $sqlAdmin -P $sqlPassword -i 'managed-identity.sql' -v newUserName=$($outputs.webAppName) identitySid=$byteGuid

# Close Sql Firewall for the agent
az sql server firewall-rule delete --name 'agent-rule' --resource-group $resourceGroupName --server $outputs.sqlSvrName
Here are the SQL statements, managed-identity.sql, to add user and grant permissions:
CREATE USER [$(newUserName)] WITH default_schema=[dbo], SID=$(identitySid), TYPE=[E];
GO
EXEC sp_addrolemember 'db_datawriter','$(newUserName)'
EXEC sp_addrolemember 'db_datareader','$(newUserName)'
EXEC sp_addrolemember 'db_ddladmin','$(newUserName)'
GO
Azure DevOps: Manual Validation Task
It is possible that you cannot have Directory.Read.All permission for your Azure DevOps Service Principal, then you need to manually add the web app managed identity as SQL user. For demonstration purpose, I added a Manual Validation step in the dev environment CD pipeline:
  # For demostration purpose, to show manual intervention
  - template: '/${{variables.yamlTemplateLoc}}/manual-add-sql.yaml'
    parameters:
      targetEnv: ${{variables.targetEnv}}
      managedIdentityName: ${{variables.appServiceName}}
      dependsOnJob: 'Deploy_App'
The task in the template, manual-add-sql.yaml, generates the proper SQL statements so that they can be copied and executed accordingly:
  - task: ManualValidation@0
    timeoutInMinutes: 1440 # task times out in 1 day
    inputs:
      instructions: |
        Ensure the Managed Identity is added to SQL, if not, execute:
          CREATE USER [${{variables.managedIdentity}}] FROM EXTERNAL PROVIDER;
          ALTER ROLE db_datareader ADD MEMBER [${{variables.managedIdentity}}];
          ALTER ROLE db_datawriter ADD MEMBER [${{variables.managedIdentity}}];
          ALTER ROLE db_ddladmin ADD MEMBER [${{variables.managedIdentity}}];
      onTimeout: 'resume'
Deploy the Web App
Since the scm site of App Service is now restricted by firewall rules, we need to open it temporarily to deploy the application and close it when the deployment is done, here are the Azure CLI commands copied from deploy-web-app.yaml:
# Get IP address of the Build Agent
$agentIP = (New-Object net.webclient).downloadstring("https://api.ipify.org")

# Add firewall rule for scm site to allow access from this build agent
az webapp config access-restriction add --resource-group $(rg-full-name) --name ${{parameters.webAppName}} `
    --rule-name build_server --action Allow --ip-address "$agentIP/32" --priority 250 --scm-site true

# Deploy the web app

# Remove firewall rule for scm site for this build agent
az webapp config access-restriction remove --resource-group $(rg-full-name) --name ${{parameters.webAppName}} `
    --rule-name build_server --scm-site true
SQL Pricing and Sizing
SQL Pricing and Sizing is always a complicated topic for application team, and there is no easy answer for it. I mainly worked with enterprise customers in my past, they prefer ‘provisioned compute’ rather than ‘serverless compute’ because they want to avoid any uncertain, such as the latency for scaling out. However, it could be different in your case, check out Serverless compute tier – Azure SQL Database (MS Doc link) to see if serverless is suitable for you or not.
My suggestion is to have your DBA to work out several ‘predefined’ sizing models that fit most of your organization usages and coded them into your Bicep module. Then, the dev teams can just quickly pick the reasonable sizing for their application as a starting point. In the era of cloud computing, I wouldn’t suggest spending a lot of time initially to determine the sizing you need, rather you should figure out how quick you can scale up or down to change the sizing.
// Use the following az cli to determine the available sizing in your target region
// az sql db list-editions -l {location} -o table
@allowed([
  'basic'
  'medium'
  'high'
  'intense'
])
@description('Predefined sizing of the SQL database')
param sqlDbSize string

// Predefined a set of sizing for your organization
var dbSizeConfigure = {
  basic: {
    name: 'Basic'
    tier: 'Basic'
    size: 'Basic'
  }
  medium: {
    name: 'Standard'
    tier: 'Standard'
    size: 'S2'
  }
  high: {
    name: 'Standard'
    tier: 'Standard'
    size: 'S6'
  }
  intense: {
    name: 'Premium'
    tier: 'Premium'
    size: 'P6'
  }
}
Closing out
I added a lot more details for this recipe compared to the first one (link). I hope this approach provides additional insight for you to understand the recipe and customize it for your needs. As usual, please let me know if you have any suggestion to improve documenting the recipe or structuring the sample code.
